So, I made bagels. And not just once — I tested two different methods just for you.
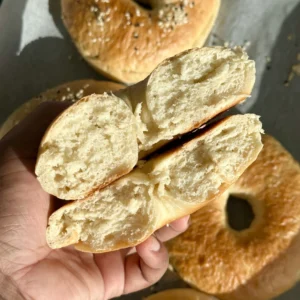
The first time, I shaped the dough and let it ferment overnight in the fridge. The result? Perfectly golden, chewy bagels with a crust that had just the right amount of crunch and color. The second time, I skipped the overnight step and went straight into boiling and baking. Were they good? Yes. But if I’m honest… they looked and felt more like soft bread rolls than real bagels.
Bagel Recipe
Ingredients
- 4 cups all-purpose flour
- 4 tablespoons all-purpose flour for adjusting the dough, if needed
- 4 tablespoons sugar
- 2 teaspoons instant yeast
- 1 teaspoon salt
- 1 ½ cups + 2 tablespoons warm water
- 2 tablespoons brown sugar for boiling water
- Optional Toppings
- Sesame seeds
- Poppy seeds
- Everything seasoning
- Brown sugar + ground cinnamon for a sweet version
Instructions
Prepare the Dough
- In a large mixing bowl, whisk together the flour, sugar, instant yeast, and salt.
- Add the warm water and mix until a shaggy dough forms.
- Knead the dough by hand or with a stand mixer fitted with a dough hook for about 8–10 minutes, until the dough is smooth and elastic, not sticky.
- If the dough is too sticky to handle, add the extra flour one tablespoon at a time and continue kneading.
Shape the Bagels
- Once the dough is fully kneaded, divide it into 8 equal portions
- Roll each portion into a smooth ball.
- To shape into bagels, poke your finger through the center of the ball and gently stretch it outward in a circular motion until a 2–3 cm hole forms in the center.
Tip: Make the hole slightly larger than you want it to end up, as it will shrink during proofing and baking.
- Place the shaped bagels onto a parchment-lined tray. Make sure to leave some space between them.
Choose Your Proofing Method
Overnight Method (Cold Ferment – Recommended)
- Cover the tray tightly with plastic wrap or a clean cloth and place in the refrigerator overnight (8–12 hours).
- The next day, remove the tray and let the bagels rest at room temperature for 20–30 minutes while you bring your water to a boil.
- This slow rise improves flavor and gives the bagels a chewier texture and more even browning.
Same-Day Method
- If you’re in a hurry, let the shaped bagels rest at room temperature, loosely covered, for about 1 hour or until they puff up slightly.
- This method works well, but the crust may be softer and give you a bread like texture compared to the overnight version.
Boil the Bagels
- Preheat your oven to 200°C (390°F) while boiling the bagels.
- Fill a wide, deep pot with water and bring it to a rolling boil.
- Add 2 tablespoons of brown sugar and stir to dissolve. This helps give the crust a golden color and slight sweetness.
- To protect the bagels’ shape when moving them into the water, cut the parchment paper around each one and gently lower the whole square into the boiling water. After a few seconds, the parchment will loosen —carefully peel it off . This keeps the bagels from deflating or sticking.
- Boil for 30 seconds on each side for a thinner crust and lighter chew.
- If you prefer a thicker, chewier crust, boil them for 45–60 seconds per side.
- Remove the boiled bagels and place them back on the lined baking tray.
Add Toppings (Optional)
- While the bagels are still damp from boiling, sprinkle your desired toppings directly on top.
- Press gently so the toppings stick.
Some topping ideas:
- Sesame seeds for a classic finish
- Everything seasoning for bold flavor
- Brown sugar + cinnamon for a sweet version
Bake
- Bake the bagels in the preheated oven for 20–25 minutes, or until the tops are golden brown and the bottoms are lightly crisp.
- Rotate the tray halfway through baking for even color, if necessary.
- Remove from the oven and let cool on a wire rack.
Video
Notes
They can also be frozen for up to 1 month.
To reheat, slice and toast before serving.
FAQ
Can I skip the overnight ferment?
Yes, you can! Just let the shaped bagels rise at room temperature for about 1 hour before boiling. They’ll still taste good — more like a soft roll — but they won’t have that signature chew and deep flavor that comes from a slow, cold fermentation.
Why do I need to boil the bagels before baking?
Boiling gives bagels their signature crust and chew. The brown sugar in the water also helps them develop a beautiful golden color in the oven. It’s what sets bagels apart from regular bread rolls.
Can I boil the bagels for longer?
Yes — the longer you boil them, the thicker and chewier the crust becomes. For a softer crust, boil for 30 seconds per side. For something chewier and more classic, go for 45–60 seconds per side.
What toppings do you recommend?
For a classic flavor, sesame seeds or everything seasoning work great. But if you’re craving something sweet, sprinkle on cinnamon and brown sugar — it honestly tastes like a cinnamon roll (no exaggeration).
Can I make these gluten-free?
Bagels need strong gluten to get that chewy texture, so a direct gluten-free swap won’t work well here. You’d need a recipe specifically developed with gluten-free flours and binders.
How should I store them?
Store cooled bagels in an airtight container at room temperature for up to 3 days. They also freeze beautifully — just wrap them individually and pop them in a freezer-safe bag for up to a month. Reheat by slicing and toasting.
Can I use whole wheat flour instead?
You can swap in up to half of the flour for whole wheat. Any more than that and the texture might become dense and dry, so be sure to increase the water slightly if you go that route.